

Cute Easy Nail Designs for Beginners
I absolutely love being a girl; put on my makeup and have my hair and nails done…it’s way too much fun! But, as you all know, the price of beauty does break the bank or at least a big hole in your wallet at the end of the month so one thing I love to do with my friends is creating our own DIY-Do It Yourself manicures. Although I have a bit of an art background, I can barely do some of these amazing designs you see all over the internet! So here are some easy nail art for beginners that I have tried that I found to work very well, vary from ridiculously quick to takes a few minutes per nail. I’ll include what you’ll need so you can be ready for your next night out with added style!
1Easy Ombre Nails

- White basecoat
- Two colors
- Clear Topcoat (or clear with glitter topcoat)
- Cosmetic Sponge
- Vaseline for around your nails for excess paint
First, you will need to apply Vaseline around the nail to stop excess color from adhering to your skin. His can become very messy if you don’t apply Vaseline first…trust me on this one! Secondly, a white basecoat should be applied to your nails for the gradient colors to show up properly. Next, after the white basecoat has dried, apply the colors onto the sponge with the two colors joined together in the middle to create a mixed color (using the corner of the sponge to mix them works great). Stamp onto a piece of paper a few times to remove the excess paint then stamp onto your nails to see the ombre colors. Finally wait until the colors are dry before applying a clear topcoat. Use a fine q-tip to remove the Vaseline with any excess paint. Then you are done. If you pick two complimenting shades of a color, it gives a real subtle ombre look which is acceptable at the work place. I like applying a hint of glitter topcoat to add some extra fun on an accent nail!
2Rainbow Cheetah Nails
- White Basecoat
- Several Bright Fun Colors
- Clear Topcoat (or clear with glitter topcoat)
- Black Polish
- Skinny Paint Brush
- Vaseline for around your nails for excess paint
I do love having these cute and wild rainbow prints on my fingers. You don’t have to do a white base but the white will make the colors pop out much more than if you did a pink or any other color. First, you will need to apply Vaseline around the nail to stop excess color from adhering to your skin. Secondly, a white basecoat should be applied to your nails to make the colors pop. Next you will make several dots in different colors (doesn’t matter the size or the shape). Then once the colors are dried, use your skinny brush dipped in black polish and create outlines around the colors creating an animal print shape. When completed, use a clear or clear with glitter topcoat to seal in the design and wipe away the Vaseline and any excess color.
3Chevron Nails

- White basecoat
- A Bright Polish (Hot Pink also Turquoise were GORG!)
- Clear Topcoat
- Black Polish
- Glitter Polish
- Skinny Paintbrush
- Vaseline for around your nails for excess paint
This design works best when used with bright colors…it’s one of my go-to designs. I’ve tried with white nails and also with black but they look too Beetlejuice’ish and not trendy and sleek. First you will need to apply Vaseline around your nails to avoid excess polish from sticking to the skin. Next, paint nail with a white polish to make your colors pop, making sure the ‘chevron’ nail has a smooth, solid white finish since it will be seen. Once dried, paint all nails except the ‘chevron’ and ‘glitter’ nail with a solid, bright color. For the ‘glitter’ nail, make sure the glitter polish is evenly distributed which may require several coats. Lastly, the hard part…the ‘chevron’ nail. You will need a steady hand (or not much caffeine) and you will SLOWLY outline zig zags on your white nail with the skinny brush and black paint. Once the outlines are dried, fill in the zig zags carefully (the dried outlines will help keep the filling color to stay in the lines). Finish off when dried with a clear topcoat.
4Dainty Romantic Nails
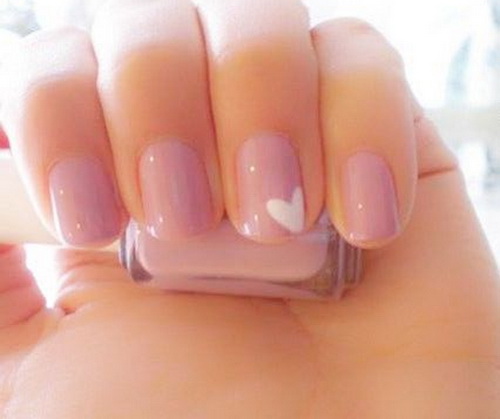
- White Polish
- Light Pink Polish
- Clear Topcoat
- Skinny Paintbrush
- Vaseline for around your nails for excess paint
This is one of my favorite, dainty designs to do. It’s so simple yet very classic. This looks wonderful on long or short nails and various skin tones so it really is perfect. First, you will need Vaseline around the nails to stop excess color from sticking to your skin. Secondly, a white basecoat should be applied to your nails. Next, you will paint your nails with the light pink polish distributing the color evenly. Once your color is dried, get the skinny paintbrush and create a small heart outline and wait until dried. When your outline is dried, you will fill in the heart with the white polish and let dry. When your nails are completely dry, add a topcoat to make the manicure last longer. Lastly, remove the Vaseline and enjoy your simply dainty, romantic nails. Adding a few more various size hearts also looks extremely cute to this design and should also be considered as a bolder yet simple statement.
5Fan Nails
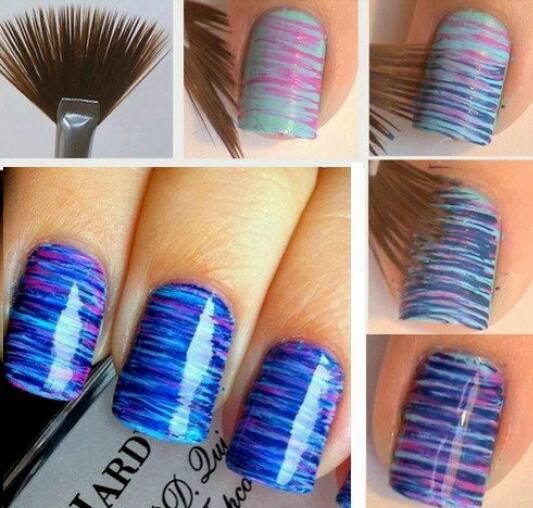
- White basecoat
- Three Complimenting Colors
- Clear Topcoat (or clear with glitter topcoat)
- Fan Brush
- Paper Plate
- Vaseline for around your nails for excess paint
A great thing about these fan nails are that once you know how to do them, you can wear and personalize them for any season or event. These are really fun and simple to do. First, you will need to apply Vaseline around the nail to stop any color from adhering to your skin. Secondly, a white basecoat should be applied to your nails for the colors to show up. Next, after the white basecoat has dried, you will need to pour each nail polish color onto the paper plate. Dip the fan brush back and forth across each nail taking turns with each color, one at a time. It works well if the colors are still a bit wet as the colors will blend together creating extra colors that will complement each other to create a nice added effect. Once the colors are semi dry, apply the clear topcoat which will lightly blend in the colors to create a smoother look. For a more subtle look, add a fan nail on each hand with the remaining nails with a solid color to still have a bit of fun to your work nails.
6Rainbow Nails
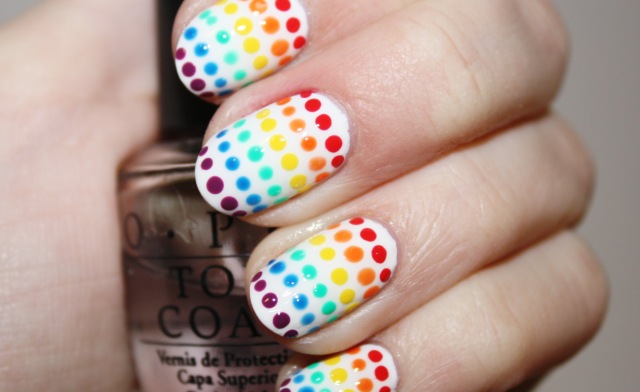
- White Basecoat
- Rainbow Colors (ROYBGIV order) Red, Orange, Yellow, Blue, Green, Indigo, Violet
- Clear Topcoat (or clear with glitter topcoat)
- Flat Edge Pin or Flat Top Nail
- Vaseline for around your nails for excess paint
I LOVE rainbows and this design is so much fun when applied to your toes, especially during flip flop weather. I tend to do a rainbow accent nail on each hand but do the rainbows on all of my toes. Apply Vaseline around the nail to stop excess color from adhering to your skin. Secondly, a white basecoat should be applied to your nails evenly so the white color will be smooth and solid. In ROYBGIV order (see above) dip the flat part of the tool of your choice in one color spacing out the dots carefully on each nail. Repeat with the remaining colors carefully and slowly. Don’t worry if the circles aren’t perfectly even or spaced out perfectly, you will still get the awesome look regardless. When the colors are completely dry, you will need to apply your topcoat but make sure the colors are totally dry before applying the topcoat or all your work will be ruined (trust me on this one!). Once your nails are dried, remove the Vaseline to create a clean, bright and fun look.
7Sponge Tip Nails

- White basecoat
- Two pastel colors
- Clear Topcoat (or clear with glitter topcoat)
- Cosmetic Sponge
- Paper Plate
- Vaseline for around your nails for excess paint
I’ve worn these with my short nails during the summer season and love them. They really do give off a beach girl vibe! First, you will need to apply Vaseline around the nail to stop excess color from adhering to your skin especially when you are using a cosmetic sponge. Next, a white basecoat should be applied to your nails for the gradient colors to show up properly. Next, after the white basecoat has dried, you will then apply the darkest of the two colors on your nails. Before nails are fully dry, dip the lighter color onto the sponge to create a mixed color when applied to the tips of your nails. Stamp onto a piece of paper a few times to remove the excess paint then stamp onto your nails to see the colors without them looking too heavy. Finally wait until the colors are dry before applying a clear topcoat. Use a fine q-tip to remove the Vaseline from your nails. Apply a hint of glitter topcoat to add some extra spark to the look! if you’re looking for cool easy nail designs , I think this one is a winner!
8Valentine’s Nails
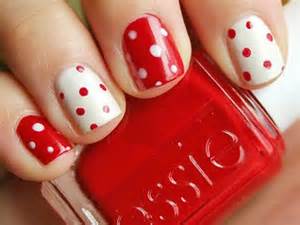
- White basecoat
- Red Polish
- Clear Topcoat
- Flat Top Pin or Flat Top Nail
- Vaseline for around your nails for excess paint
These nails are perfect for the season of love! This is a simple design that you will love. Vaseline will need to be applied around the nail to stop excess color from adhering to your skin. Secondly, a white basecoat should be applied to your nails evenly and carefully to avoid any lines. Next, after the white basecoat has dried, you will paint every other nail red which may require two coats to really give that bold feel. Once the colors are dried, you will dip the flat tip tool in white for polka dots on the red nails and dip the tool into red to create polka dots on the white nails. Finally wait until the colors are completely dry before applying a clear topcoat or the polka dots will smear. Use a fine q-tip to remove the Vaseline with any excess paint. That’s it, and it’s beyond cute for a Valentine’s Night out. This is my favorite Valentine’s look for my peep toe shoes during the month of February.
9Branch Nails
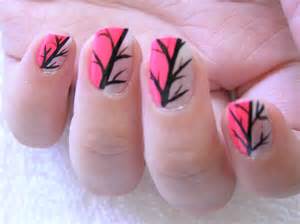
- White basecoat
- Two Colors (tan/camo green looks awesome!)
- Clear Topcoat
- Black Polish
- Skinny Brush
- Vaseline for around your nails for excess paint
First, you will need to apply Vaseline around the nail to stop excess color from adhering to your skin. As for every design I always suggest a white basecoat for the colors to appear better. Next you will need to paint each nail half with one color and the other half with a darker toned color slightly angled. Once your nails are dry, use the skinny brush dipped in black and create a line separating the two colors. You will then create different size branch lines coming from the base line. To give it more of a natural feel, lightly create the branches without applying too much pressure to the brush so the branches will have a flowing appearance. Once your nails are dry, top with a topcoat then remove the Vaseline from around the nails. This look works really well as an accent nail as the others are solid to give a toned down look. I’ve found that when created with tan and camo green or pink and camo green gives a really cool girly camouflage effect.
10Dark Neon Nails

- White basecoat
- Black Polish
- Clear Topcoat
- Flat Tip Needle or Flat Tip Nail
- Six or Seven Bright Colors
- Vaseline for around your nails for excess paint
I LOVE this look! It even looks awesome with basic white dots as well. This is pretty simple and can be done pretty quickly. After your white basecoat has dried apply a nice coat or two of the black polish totally covering any hint of the white basecoat. After the black dries, dip the flat tip tool in a bright color to create a circle on your nail. Repeat with each color and go up the nail. You will next need to pick colors that work well together (pink/purple; yellow/green) to go on the base of the other nails. Once the colors are totally dry, you will then finish off the look with a topcoat. Lastly, remove the Vaseline from around your nails for the completed look.
11Strobe Nails

- White basecoat
- Bright Colored Polish
- Clear Topcoat (or clear with glitter topcoat)
- Black Polish
- Tape cut into thin strips
- Scissors
- Vaseline for around your nails for excess paint
These are really cool nails especially if you can find a really good glow in the dark nail polish. I have done this many times with the glow polish which gave an awesome effect under the black lights. Apply your Vaseline around your nails. You will need a layer of the white basecoat first and wait for your nails to dry. Next, you will paint over the white with a bright colored polish (I’ve even have tried this with multi colored nails and it worked great!). Once nails are COMPLETELY dried, you will apply cut up thin pieces of tape in different crisscross directions and smooth out. Paint over entire nails including over the tape. You must wait until nails are totally dry and not a bit tacky so black doesn’t lift when pulling up the tape. When nails are completely dry, carefully pull off the tape. Once this step is complete, apply a clear or glitter topcoat.
12Open Heart Nails

- White basecoat
- Light Pink Polish
- Clear Topcoat
- Black Polish
- Skinny Paintbrush
- Vaseline for around your nails for excess paint
This open heart looks really good as an accent nail since I found that it is a bit difficult to create when using my left hand (I’m right handed). I tend to paint the rest of my nails black to give a sleek feel. You will first paint your nails with a layer of the white basecoat until dried. Next you will paint the accent nail a light color (although pinks really do look great with the black) and let dry. As you are waiting for your accent nails to dry, paint the remainder of your nails black and let them sit to dry. When you are ready to create the open heart on your dry accent nail, you will start off with a ‘V’ shape at the base of your nail with the skinny paintbrush and the black paint. Next you will SLOWLY create the sides of the heart to meet at the tip of your nail. Let it dry. Once the outlines are dry, you will fill in the outside of the heart with black polish, carefully not missing any areas. There you have it, once your nails are dry you will seal with a clear top coat. For a little sparkle, try adding a light sparkle topcoat underneath the black to give the heart added shine.
13Gradient Nails

- Three shades of a similar color
- Clear Topcoat
- Tape
- Vaseline for around your nails for excess paint
I’ve only done these on my toes and they still turned out really cute, especially in blues and in pinks. Apply your Vaseline first around your nails. Next you will paint your nail with two layers of the lightest color. Let dry. Once the nails are completely dry, angle the tape covering the base of the nail and apply the next shade up only applying one layer. Let them dry. Gently remove the tape from the dried nails and cover the area you just painted over with fresh tape. This time you will be getting the darkest shade and painting over the angled top of the nail that is left to be painted. Wait til it is completely dry before removing the tape. Once you are completed, finish up with a clear topcoat.
14Easy Christmas Nail Designs – Stripe Nails
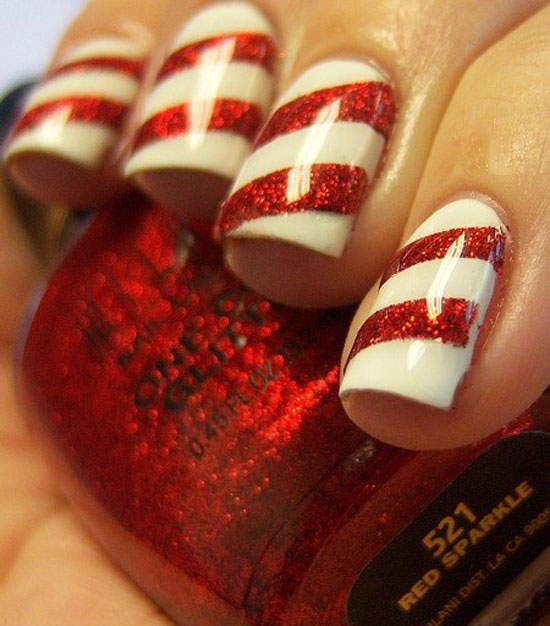
- White basecoat
- Clear Topcoat
- Red or Black Polish
- Tape
- Vaseline for around your nails for excess paint
This is a very easy DIY nail art. These nails are great during Christmas or Valentines with the red and white look or you can change it up and add black and red or white and black instead. Point is, have fun with it! Apply your Vaseline around the nails before applying your white basecoat in two layers evenly. Once COMPLETELY dry, you will apply pieces of tape angled so only two spaces are not covered and need to be filled in. Paint over entire nail including the tape with the red polish. Apply two coats if needed. When your nails are totally dry (not tacky but dry) slowly peel back the tape. Finish off your design with a nice clear topcoat and you are set!
15Softball Nails

- White basecoat
- Red Polish
- Clear Topcoat
- Favorite Team’s Color Polish
- Skinny Paintbrush
- Vaseline for around your nails for excess paint
I am a Softball girl…all of my life I loved playing softball! These nails have been worn so many times on my fingers and toes that I’ve lost count. Now a day, I will wear these to our local Phillies games (Go Phillies!) or to any sporting events to support my children or nieces and nephews. To add a personalized touch to it, use another finger to create an accent nail with a sports number, letter or even a name. First you will need to apply the Vaseline around your nails. Next apply a white basecoat on all the nails, but applying two coats on your accent nails. When your nails are dried, paint all but your accent nail with your favorite team’s color (mine is red) making sure it is covered evenly. Depending on the brand of polish you may need two layers to create a solid look. Next, you will get your skinny paintbrush and dip it in the red polish and slowly create two half circles from the base of your nail to the tip. Once the half circles are dry, you will create small lines across the half circles which are the thread of the baseball. Once your nails are totally dry, apply a clear topcoat and you’re ready to cheer on your favorite team!
16Mickey Mouse Nails
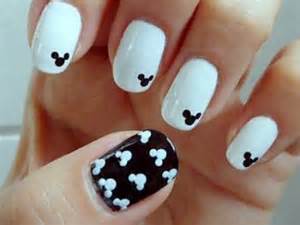
- White basecoat
- Clear Topcoat
- Black Polish
- Skinny Paintbrush
- Flat Top Pin or Flat Top Nail
- Vaseline for around your nails for excess paint
These adorable nails are my go-to design when I go to Disney. I am a HUGE Disney person so I really enjoying having fun nails to go with feeling like a kid at Disney World. I personally have done this by also adding a few Mickey heads that were yellow and some red to add on to the Disney theme, but it’s up to you. Like always, apply Vaseline around your nails before applying paint. First you will apply about two coats of white polish so the white becomes a nice solid smooth color distributed evenly. Secondly, once the white has dried, you will paint the accent nail black, making sure that any white is not visible. Once the paint is dried, you will carefully dip your flat top tool in black polish to create one dot on each white nail. It really helps if you wait a minute before creating the ears so the dot that represents the head doesn’t smear. Next you will dip a cleaned flat top tool in white and do the same as above to create those Mickey faces on the accent nail. Top off with a clear top coat when dry.
17Floral Nails
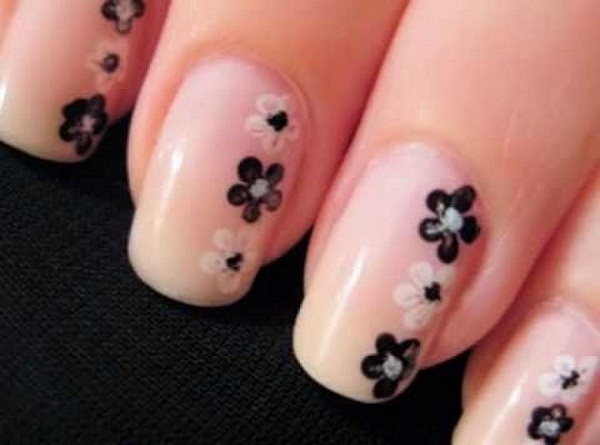
- Light Pink Polish
- Clear Topcoat
- Black Polish
- White Polish
- Skinny Paintbrush
- Vaseline for around your nails for excess paint
If you like flowers these are really easy cute nail designs. These nails are very cute to do and it’s not too bad to create on your opposite hand as well since the flowers don’t need to be perfect. Start off applying Vaseline around your nails to stop any excess paint. Next, you will paint two layers of the light pink polish to create a smooth, even appearance. Once your nails are dry, carefully get the black paint with the skinny paintbrush and slowly create the black flowers first on the nails. It’s not as hard as you may think…try upside down teardrop shapes and join all the points together. Next you will get the white and create the white flowers following the directions above. As you wait for the white flowers to dry, you will apply a white dot in the center of each black flower. You will then dip your paintbrush into the black and create black dots in the center of each white flower. Your nails should have a pattern effect….white, black, white, black,white… Once your nails have dried completely, apply a clear topcoat and let dry. You are done! These nails look much more difficult than they actually are and you will be able to do them in less time with more practice!
18Hip Manicured Nails
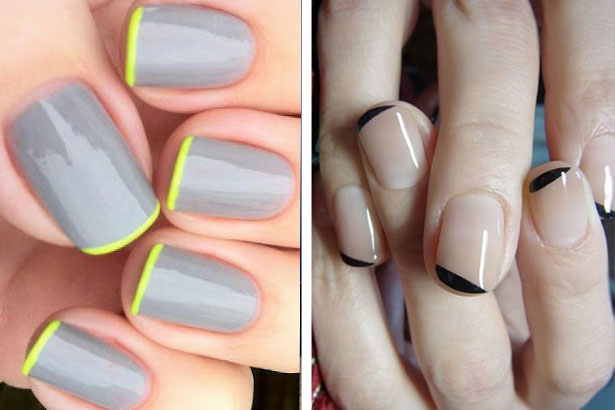
- Beige or Nude Polish
- Clear Topcoat
- Black Polish or really any bright color
- Skinny Paintbrush
- Tape
- Vaseline for around your nails for excess paint
These aren’t your traditional manicured nails…and I love them! I enjoy doing these with black tips on a nude polish but really, you can mix it up with different variations. Because these are very light nude colors that I like to use, I do not use a white basecoat as I would with other designs. Start off by applying Vaseline around your nails before painting. You will need to carefully apply two coats of your beige or nude polish to make sure it becomes easily distributed. When your nails are TOTALLY dry, you will apply the tape either straight across the top of the nail leaving the tip to be painted or for a more dramatic effect you can do my favorite and angle the tape so there is more color on one side than the other. Wait until the colors are completely dried to avoid smearing and apply a clear topcoat. To add a little sparkle, a glitter topcoat always looks great. These are great easy nail designs for short nails as well!
19Glitter Ombre Nails

- White basecoat
- Glitter Polish
- Clear Topcoat
- Black Polish
- Skinny Paintbrush
- Vaseline for around your nails for excess paint
Looking for festive DY easy nail art designs? These are very stylish, sleek looking nails that I like wearing for nights out. They are not over the top, but they are not plain Jane black either. First things first, apply the Vaseline around your nails to catch any paint. Next, apply your white basecoat to your nails and let dry. Then you will carefully paint over the white basecoat with your black polish; possibly needing two layers to get a nice, solid color. When your nails are dry, you will get the glitter polish and cover the bottom of the base of your accent nail. Next, you will get your skinny paintbrush and slowly drag some of the glitter up and over the nail creating a ombre effect going dark to light. Once your nails are dried, apply a clear topcoat to complete your look.
20Geo Nails
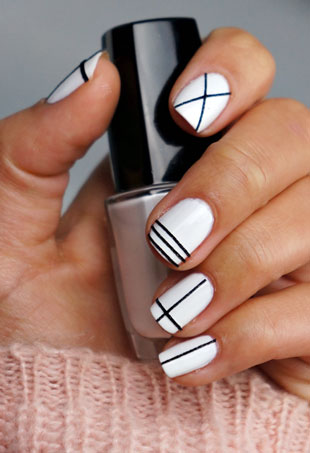
- White basecoat
- Clear Topcoat
- Black Polish
- Skinny Paintbrush
- Vaseline for around your nails for excess paint
There’s just something about these industrial looking geo nails that I love! Whether it’s on your toes or your fingers, these nails are stylish. Apply the Vaseline around your nail to keep any excess paint from sticking to your skin. You will need to apply a couple basecoats of white so the color is bold and even. Next, once your nails are dried, you will use the skinny paintbrush and create basic lines in any direction or pattern you choose keeping in mind one or two lines should be max since it’s all about the simplicity. Once your nails are dried, apply a nice clear topcoat and enjoy these awesome works of art!
These really are some fun and easy nail designs to try out, especially after you got the hang of them and can do them fairly quickly. So call up your girlfriends, grab a movie and create some awesome cute and easy nail designs, but most importantly, have fun and get creative!


